Don't you believe me? see for yourself. This take was shot in midday full sun without any reflector or help to lower the contrast ratio of the image in any way.
As you can see there is no detail loss whatsoever in the shadows or highlights. When i first opened the footage on our Davinci Resolve station i saw what i expected to see: a blown out sky, wall and part of the floor. But then i pushed the gain down and was happily surprised to see that all the information was there. Notice that the frame grab has no color grading whatsoever, only the gain in the highlights area pushed down i a very crude way just to see that the information is there.
But may be the most important thing is that the information is not reduced in range like in an HDR but you continue having the whole set of values at your fingertips. If you want to output to Rec. 709, fine, just push you gain down and adjust the gamma to match your taste. Do you want to print in 35mm with whatever the method of your like? fine too, now you have a gamut that exceeds the 35mm film color space.
We had no time to do a real latitude measurement, sorry for that.
The camera has a button where you can access a hi and low key lot allowing you to see in the screen that is not capable of showing so wide latitude if you are clipping the whites or crushing the blacks, but we discovered that by the end of the second day. Very handy!
In the other hand, working with very low light the unit sensitivity did a great job. We shot all the interiors using the natural light available (just a small tungsten fresnel here and there ocassionally when the image needed some rim light). With its 800ASA base sensitivity, even pushing it over 1600 ASA the noise level is very, very low, but, perhaps more important the range of tones captured in the low light area are truly rich and detailed.
Noise
The noise produced by this camera is extremely low and the little noise produced pleseantly resembles a nice film grain. I couldn't find SNR figures in the brochure but anyway for most of the people values expressed in decibels are not really meaningful. Also, normally the snr measurement is made with no signal (with the cap on) and it is a mean square root of the whole sensor noise sometimes giving a false idea of how the noise is ditributed over the diverse tones.
Because of that i did a simple exercise so you can see with your own eyes: I took two frames and made an absolute difference between them.
Now you can see that the sky has a little noise, probably produced by the clouds movement and not by the camera. There is the water area with clear changes from one frame to the next, the same as a couple of cars passing by. And now for the big surprise look at the static areas....can you see the noise? no? try to click on the image to see the full 4k plate. You can hardly see any noise? Thats right!
I must clarify that i compressed the highlights of the image to fit the 0-110 IRE region of the parade monitor otherwise you wouldnt see any noise in the sky too. Thas is why the image looks so dark. Even though you can see the level of detail that is retained when looking at the full plate (click on the image to get the 4k version)
Glasses
Any kind of lenses with PL mount will do, but here i need to warn you. The extreme high photosite count in this camera means that you must use a very high end set of lenses if you want to exploit the full potential of the sensor.
That doesn't mean that you are forced to spend a fortune in lenses rental, it depends on your output and taste of course.
We tested the camera using four different set of lenses: an Angenieux 45-120 zoom, a set of Red Primes, A Carl Zeiss CP series and a set of old anamorphic russian Lomo lenses. In some tests we used a set of Black Pro Mist filters to reduce the extreme natural sharpness of the camera.
We started our tests with the Lomo set.
As we guessed this lenses gave us a soft and pleasant image perfect for a 2k output, but we wanted to push the camera to its limits so we switched to the more modern sets with a much higher MTF. Also the aspect ratio of the F65 sensor is 1.9 to 1 so, using that set of Lomo we would get an aspect ratio close to 3.9 to 1 what we considered too much for what we wanted to do. The overall contrast of this lenses was also much lower that the spherical modern counterpart.
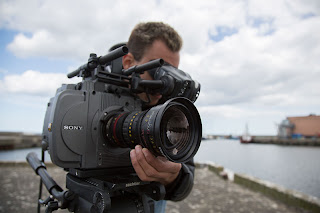
The angenieux zoom fitted on the F65
Some words about MTF (modulation transfer function)
Strange word isn't it? Sounds very complex but actually it is very easy to understand.
Modulation transfer function is a measurement of the capacity of a system (in general applied to lenses) on tranferring contrast from one side to the other. What i mean with this is: if you have an image on one side of a lens for example consisting on black and white stripes with a theorical value of pure white and pure black (and thus a 100% contrast ratio) the image produced by the lens in the other side will never have the same contrast ratio but much lower. The reasons for this are several but to keep it simple think in the difussion (scattering) of the non perfect surface and material of the lens washing the black stripes and the absorbtion and reflection lowering the intensity of the light transmitted trough the lens.
But in this case it is even more important to understand that the drop of contrast trough a system (it doesn't matter if it is a lens or a mathematical equation subject to rounding clipping, or whatever the system, the signal transfer is always lossy) is dependent on the frequency.
It continue to be obscure? follow me:
As you can see the drop in contrast in fine lines (higher frequency) is much higher than in lines that are thicker and spaced apart from each other. Eventually the drop of contrast will be so high that we wont be able to recognize the lines, that point is called the resolving power of the system. Note that the contrast ratio and the difference in contrast of this picture is illustrative only, each system or lens will have their own characteristics.
That is why it is called Modulation Transfer Function, because is the function that describes how the modulation (contrast depending on the frequency) is transferred from one side to the other.
Now, why you should bother about this?
Well, the F65 with a so high photosite count and the higher fill factor available up to this days has a very high MTF. Translated to a human language a much lower drop in contrast in the fine details preserving the sharpness and details in a way not possible until the release of this camera.
Of course this is an oversimplification of what MTF is all about, but i think it is enough to understand the concept.
Recording formats
The F65 records your shots to the SR-R4 SRMASTER field recorder attached to the body through an optical fiber. There are basically two recording modes:
oversampled 2k or 4k Raw linear 16 bits per channel (in future firmware updates there will be the 8k option too) or using the HDcam SRcodec at 220 Mb/s (lite) and up to 880 Mb/s choosing 4:2:2 chroma subsampling YCbCr or full 4:4:4 RGB in either 10 or 12 bits. Note that this is a recording mode, not a shooting mode, that means that it doesn't matter which format you choose you are always using the full sensor and all the photosites, no crop, no line skipping, no nothing, just oversampling what it makes you image much detailed and crisp. We tested both modes with great results. If you dont need to do a complex postproduction or VFX the Hdcam recording works like a charm.
The RAW mode will fill in a 256 Gb memory pack in only 14 minutes so: consider to have plenty of 256, 512 or 1T memories if you plan to shoot the whole day in this format (and consider the time for offload in your plan, more of this later on).
Since the RAW data needs to be developed some software packages (and many more will come in the near future for sure) included the demosaicking process specific to the F65 in their programs. The kind of algoritms used on each are not known yet but a studio with enough resources can easily adapt de development process to their needs based on the speed/quality desired based on the processing power they have.
The F65 comes with the F65 Raw Viewer software (on its version 1 as for now) containing a full set of debayering options and viewing tools. You can choose your color space, gamut and LUT, do a first color adjustement, see your footage side by side or in split mode with the settings you are tweaking, see it in anamorphic mode, send to batch conversion and so on. The choices for output so far are DPX in 10 or 16 bits, OpenExr in 16 or 32 bits and F65 RAW to create a new set of metadata. You can also export anCDL from here. It work well. I hope to see the possibility to import EDL/XML/AAF editings soon.
Color Grading experience
We are not done yet with the editing of the material but i couldn't resist. I had to try to play with the colouring of some of this files!
First i used Davinci Resolve to generate the proxys for the editing. This was a pretty straightforward operation and took an acceptable time to render. As a reference I processed 1:30 hours of material recorded at 4k linear Raw 16 bits (1.5 Terabytes worth of footage) using a simple workstation:
A mac pro 2008 8 processors with 16 gigs Ram, a Quadro 4000 and a Nvidia 8800GT, as you can guess not the fastest system. Even worst the source was pushed from an external usb 2.0 drive and a 2.5 external firewire drive for the output. I processed with the full quality demosaicing, using no LUT, interpreting the files with the Sgamut with Rec.709 gamma and ACES color science and setting my outs to 1920 prores lite. Even so the proxy generation process took about 5 hours. I will update this figures when i have the chance to do a proper work using the RAID for the source and output.
Then i put my fingers on some files grading directly the original 4k footage and played with the colouring. Man! The image is like rubber! You have so much information there that you can pull details to every direction very hard without any banding or artifacts.
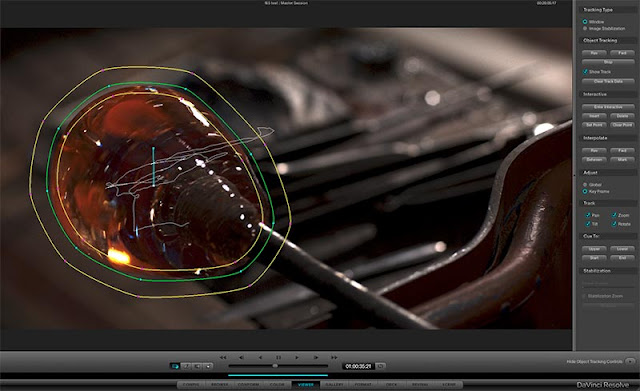
To track a window in Resolve was a great surprise too. I'd never saw a mask sticking to the shape so perfectly, even if i was tracking an object that was rotating and at the same time moving all over the screen and going partially out of frame. The only moment that i had a small non critical shift was during a very hard focus pull where the object got completely out of focus (and even so the tracking was possible!!!). All the perspective changes of the melted glass were perfectly copied. I can hardly asses the huge time savings that this level of precision can bring during a complex grading.
To do qualifications during the color grading it is a dream too. Working in the ACES gamut with 16 bits allows you to select an incredibly fine range of HSL values with a very high detail.
The image provided by this camera is somewhat videoish if compared to, let say, an Arri Alexa, but in the hands of a good colorist you shouldn't have any problem to get any look that you can imagine.
The perfect camera for postproduction?
Need to do a green screen work? Look no further.
Having green photosites for each of the 4k output, and recording in 16 bits per channel linear, this camera allows you to do a green screen as you never imagined before. There is no other camera in the world capable of doing this. No technology in the history of the cinema/video could capture so fine details in the green channel with so many gradations.
It is a dream for post producers but also it is a potential big money saver with its possibility to do perfect keys in no time.
I did also a 3d tracking test using Syntheyes. The result was the best i have ever seen.
The auto tracker gave me straight away an horizontal error of 0.6 pixels over the full 4k plate (that means an error of a third of a pixel over a 2k plate!!) without any clean up and using no manual tracking whatsoever! The scene is full of moving elements what it normally would destroy any good tracking effort but, since the detail in the plate is so high, syntheyes managed to give me a great result immediately.
This is huge!! It could potentially raise a lot the quality but most important: it will save the producers tons of money in the postproduction process!!!
Remember: this camera has a mechanical rotative shutter and no rolling shutter artifacts at all. This means that the 3d information contained in the mage is never harmed.
Of course you can choose from the menu the option to use the electronic shutter if you need to match the image with another camera.
As expected Imagineer Mocha gave also astounding results with a precision that i never saw before.
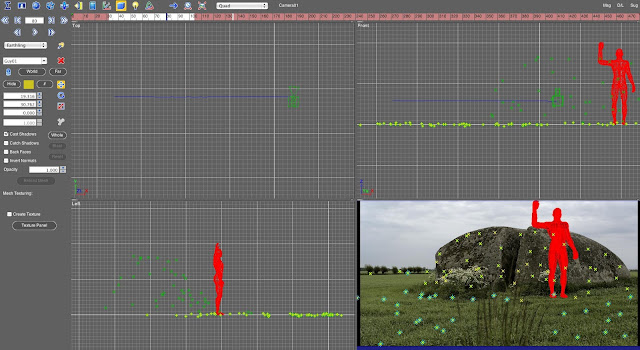
Look at the precision of the 3d reconstruction. A perfect line of the dolly with the small camera shakes clearly captured. Also notice the perfect representation of the stone and floor (the top of the grass) in the point cloud.
See the round box to the left of the image that accomodates the rotative shutter.
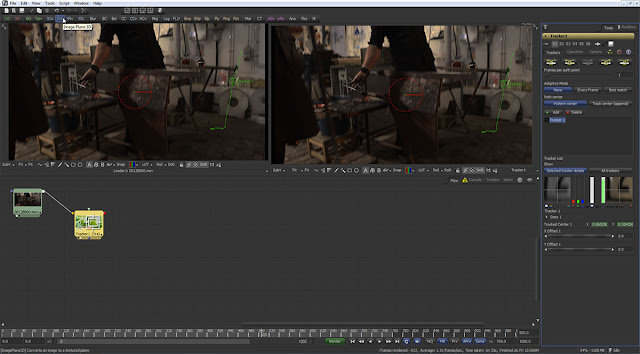
The point tracking was not any surprise either. Eyeon Fusion could follow every point even in the most challenging shots. Pay atention at the quality of the track (the green bar below the button "all trackers".
One part that need more work from Sony is the fan. It is noisy and on it high setting is really noisy. The camera has several setting for the fan including an auto 1 and auto 2 (no idea about the differences of this two modes).
Granted, that large sensor with so high photosite count and high fps will produce a lot of heat, but to shoot with sound in a quiet environment would be really tricky.
I would like to do a test with the fan at its minimum settings in a hot room for some hours to see how much it raises the noise in the picture. Next time perhaps.
Hopefully this issue will be solved soon by Sony.
SRPC-4 eSATA / GigE SRMemory transfer station
The transfer station is a small box that can read the memories to be transferred to a hard drive or a computer. The transfer station is computer itself even if you cannot run it standalone, you need a computer to control it.
The connection is done through a network cable (1gb/s or even 10 gb/s) and all the functions are driven through a web browser interface.
You can transfer the files to your computer, a hard drive connected to your machine or even to an e-sata disk connected directly to the unit.
I clearly felt that this units needs a lot more work to be finished.
The way of connecting to it is very complicated using an external program called NFS manager that remaps your disks and network connections.
The first time i did try it it didn't work. I searched for every single way that i could imagine to connect to the unit without any luck until i discovered a way to access the list of internal setting to discover that the ip address was lost and replaced by one completely strange.
Not knowing what to do i started the machine pressing the lock/unlock button at the same time. That put the unit in reset mode, i am a genius!!
Through the interface now i could reset the ip address and finally had a working connection.
Since the unit uses the standard router ip you have to be disconnected from the internet if you have a router in your system otherwise the browser will get in touch with the router instead of the sony memory reader what it is very annoying.
It is true, once the system was set up its use is rather simple even if it lack some basic functionality like to erase a single file. I heard someone saying that the lack of that function is a safety measure, but giving the price of each memory and the long transfer times i consider that function a must when you need to free some space to continue your shooting. Just add several confirmation windows before you actually are allowed to delete a file, please Sony!
Consider this, if you are recording in raw a 256 gigabytes memory pack will last for only 14 minutes and the transfer can take a very long time depending on the disk/raid/e-sata/net connection speed. As an example, with a regular usb external disk and a 1gb/s net link it took about 3 or more hours to offload a single 256 gb memory!
There is way much more to this camera, for example the possibility to shoot at 120 fps (with the next firmware revision), tons of in and outs for every scenario you can imagine, embedded IR corrected ND filters, viewing LUTs, and much more, but i will live all that stuff for the second and third part of this review.


.jpg)


